Tuesday, October 3, 2017

DIY Build Your Own LED RGB Matrix Lighting Fixtures

Our church (crosswaychurch.com) started looking for pre-made fixtures to build a wall of LED matrix lights. Had no idea where to start except Googling "LED Matrix Lights". Didn't find a lot of options and the ones we did find costs $700-$800 each. We wanted to fill our back wall as much as possible with these lights so we couldn't afford the options we were looking at for pre-made. Then came the brainstorm we had to build our own. We were already familiar with LED RGB tape strips that use the DMX controllers and power supplies, our last few stage designs used these materials, so we started asking how can we make our own matrix light fixtures using what we know about LED tape strips. Just to show you what we ended up with here is a sneak peak!


Now, how did we do it. This is where it gets fun! Using this sketch we made eight (8) of the 3ft x 3 ft matrix fixtures. Each fixture was a 16 light RGB LED matrix.  Since each of our controllers had 8 channels, we could use two controllers per fixture since we had 16 lights per fixture.


The pictures below show 1/2" plywood, but we ended up using 1/2" MDF for 6 of the 8 fixtures. It was cheaper and much easier to work with than the plywood. We had Home Depot cut our 4x8 MDF into two 3 x 3 pieces, one 1 x 8 piece, and one 2 x 3 piece. More later on what we did with the other pieces. 


After drawing the lines on the board we took a drill and drilled two holes in opposite corners in each 6x6" square, then took a jigsaw to cut out the squares.


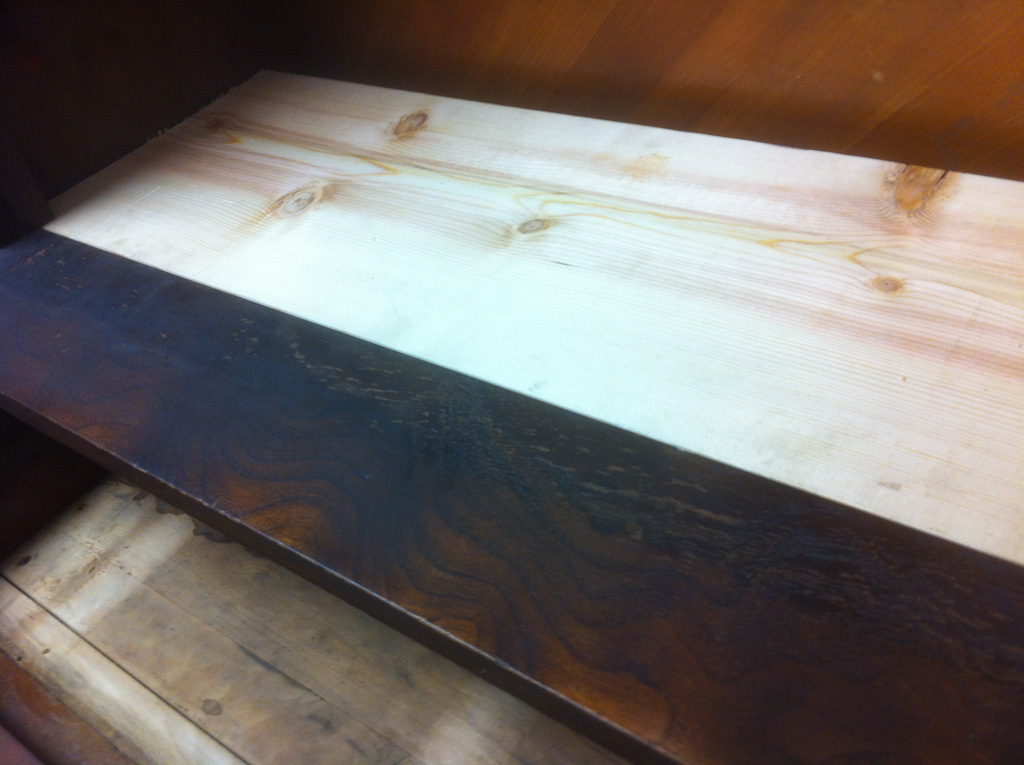
Now we have the backboard, we need to make the "inserts". To make these we bought a bunch of 6" wide by 3/4" thick pine boards (which measure out to a true 5 1/2" wide) and cut them into 5 1/2" pieces, so we ended up with 5 1/2" x 5 1/2" blocks.


These blocks were then placed inside the squares so that there was a 1/4" gap all the way around each block, and then using a piece of 35" MDF that was set on top of the blocks, we placed two screws through the MDF and into each block. It's important to do this way. By placing the blocks into the squares and centering them up before screwing in the backstrap MDF piece made it so much easier to put these together. 


Here is what the completed raw wood fixture looks like after all the wood blocks are cut and held together by the 35" MDF straps. They are held in place by putting one screw in each end of the MDF strap. 


Remember those extra pieces we had from the 4x8 sheets. We went ahead and made three 1 x 6ft light fixtures out of the long scrap pieces. Then off to the paint crew they went!


After paint, it was time to put together all the electronics. To make each light, we wrapped each wood block with LED tape, using GAFF tape to hold it in place. Place the beginning of the tape just off the edge of the wood block and tape the edge down, then start wrapping it around each wood block. When you get the block wrapped, cut off any excess then tape down the other end. Make sure you get a work crew together for this to make it go fast! This is tedious work and can easily be taught to any non-techy folks. Just need willing servants! Another trick is we put a weight on one end so we could hang them off the edge of our stage to give our team a good stable platform to work from.


If the wrap seems loose, then simply place more Gaff tape on the lights to hold them in place. At this point I should state the obvious that by wrapping around we wasted a lot of tape on the back of the blocks. We are open to any better design ideas! Soldering was not an option, it would have taken 2-3 hours per block to make that work. We literally spent days trying to figure out how to make the LED tape only have to go on the front of the block, but in the end, by wrapping the tape it was the best option. We did get a GREAT deal on this black LED tape. We got it for $5.80 per roll which is about half what it usually costs. God was looking out for us, because the day we started ordering parts an eBay vendor had a "factory sale" and sold it to us at this price. 


Then came the fun part of wiring in the Phoenix connectors (green plugs) and getting everything ready to power up. I will say another great thing we found were these "3M UY2 Connectors" for connecting the wire to the LED tape strips. We got 1000 of them for around $60.00, but they saved TONS of time. We cut off the end that comes on the LED tape and spliced the a longer wire onto the wire pigtail to give us the length we needed to reach the controller. 


To hang them on our back wall, we used hooks. That way if something broke, we could lift up the fixture and fix it. So glad we did since we've already had to repair one light that had a wire come loose. Looking at the photo below, we screwed a 1 1/2" x 1 1/2" piece of wood across the top of the fixture, and also screwed in a 1 1/2" x 1 1/2" piece of wood to the back wall. Then using hooks and eye bolts they hang freely. 


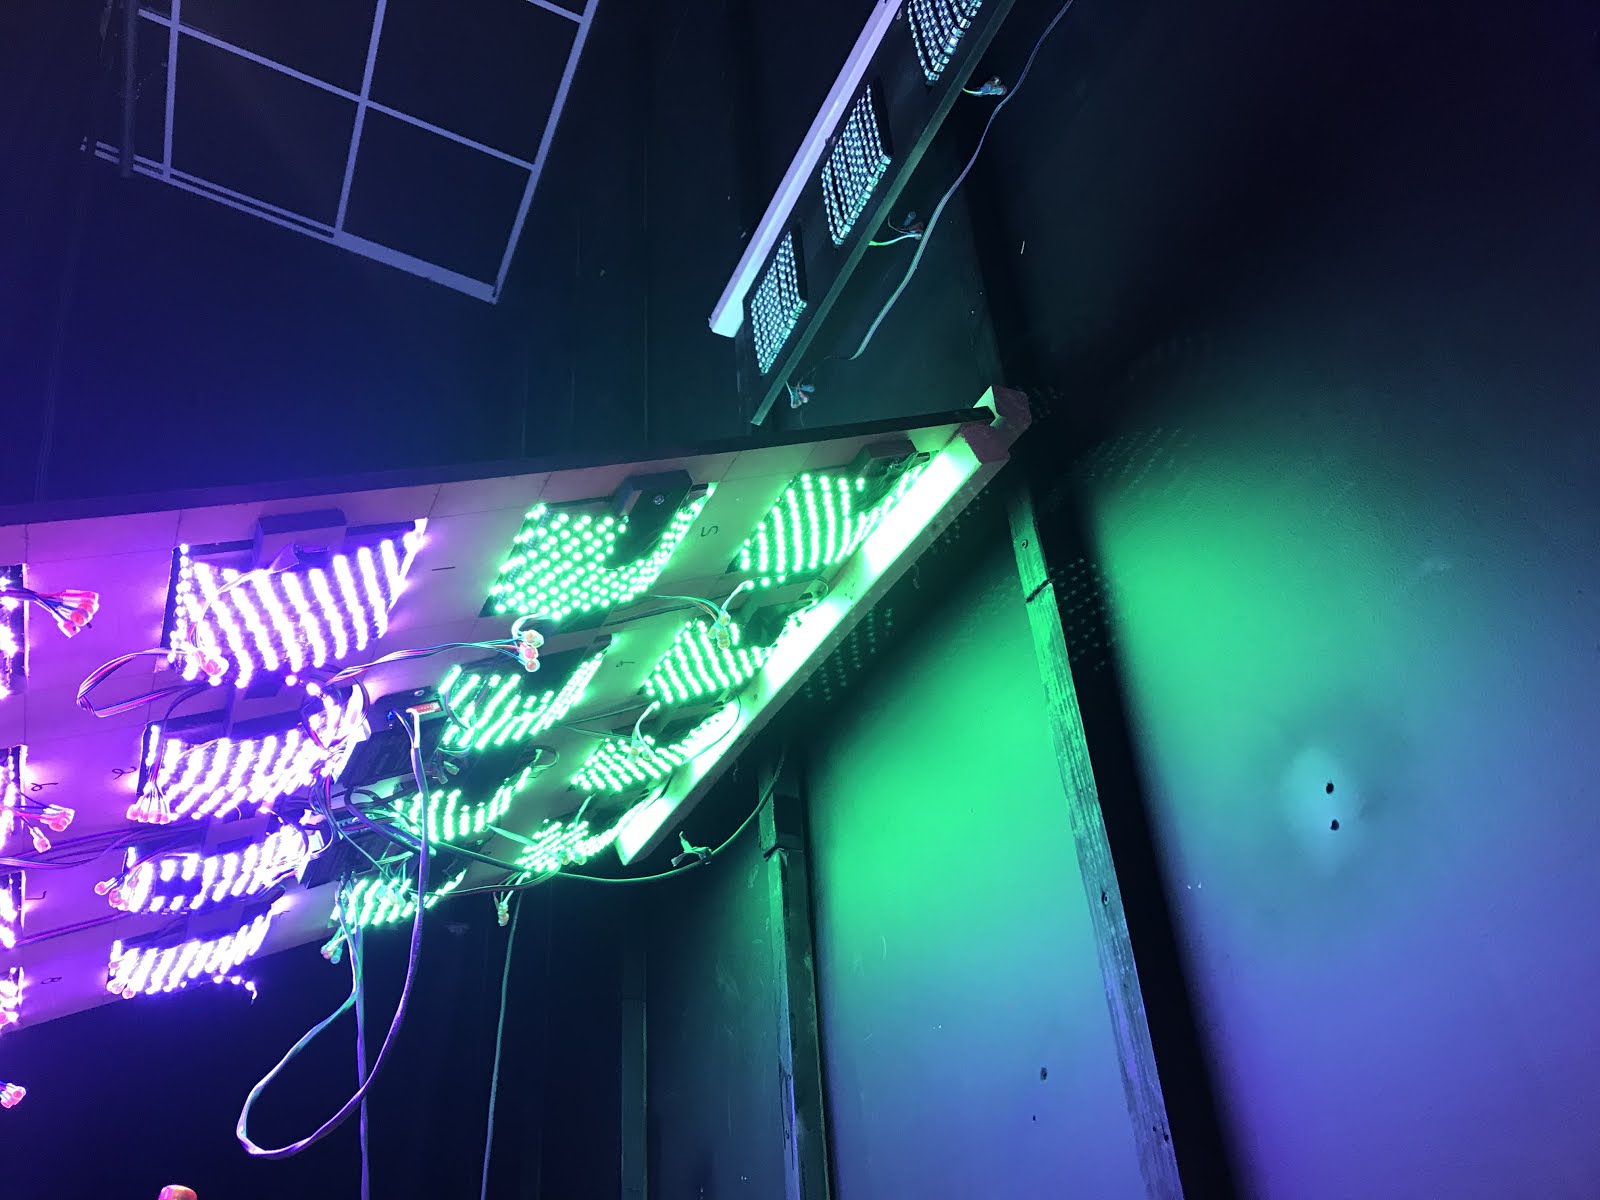
Well, that's it! Here are some photos of the final stage and some of the effects we are able to achieve. Since each block is on a separate channel, we have some very powerful effects we can do! 


If you are interested in building some of these and need some help, don't hesitate to contact me. Our team would love to help out a fellow church. This is a fairly complex job if you've never done LED tape designs before. Since we already had most of the controllers and power supplies we needed we did this entire stage design for around $1800. Here is the breakdown

175 Black LED 16ft tape - $1000
Lumber - $250
Wire and connectors - $200
Extra controllers and power supplies - $350

The entire project took 19 controllers and I believe 6-8 power supplies. Of course if you need to buy these from scratch that would add an additional $1600 to the total costs, making this project around a $3400 project, but to buy these fixtures retail would have tripled that costs easily. 

Sunday, December 20, 2015

Using a MAC and Ableton Live to fire MIDI notes over a Network for Jans Vista light software

Getting all your tools ready for MIDI in a church setting.

Several tools to use to get your MAC setup for use as a MIDI server!

Step 1 - Connect the server and all listening clients to the same network

Connect your MAC to a network (wired or wireless) within your church. All other computers (lighting, etc) that will listen for MIDI notes your server will broadcast must connect to the same network. We've used wired and wireless, but we do try to use wired if we can just to minimize the risk of disconnecting in the middle of a service.

Step 2 - Setup the MIDI network and testing it

 From your MAC spotlight, search for "Audio MIDI Setup" and open it. Then from the Audio MIDI application "Window" menu, select "Show MIDI Studio".  From this screen double click on "Network".

I usually delete any other sessions that I might have created in the past and then click the "+" sign under "My Sessions" and add your custom session for this show. I called mine "Christmas2015", and I changed the "Local Name" and "Bonjour Name" to the same thing (Easter2016 for example). Finally, change the "Live Routings" to your session, and make sure that the "Who may connect" to "Anyone". This is safe unless you have a rouge church member listening in on the MIDI network.

You now have a MIDI network ready to send and receive MIDI notes. Let's test it out by downloading a couple of tools we can use for testing.

I installed the following applications on the same MAC as the network from "Step 2" is installed on to help me troubleshoot and make sure the MIDI notes were broadcasting as expected.

1) Midi Monitor - this application listens for MIDI traffic and shows them in a window. Here is the "About" information so you know where to download it.

Here is the MIDI Monitor front screen. Click the small arrow next to "MIDI Sources" and "Spy on output to destinations" and select the network you created in Step 2. This screen will show any MIDI notes that it detects in the window at the bottom.


Now let's fire some MIDI notes and watch. To fire some notes, lets download a MIDI Virtual Instrument. I use one called "MidiMock"
Set the "Destination" to the same network session you created in Step 2. This tells MidiMock that any note you press to be broadcasted to that network.

Now you are ready to test it out. Press one of the keys on the MidiMock virtual instrument and you should see a note show up on the "MIDI Monitor" window


Step 3 - Getting Ableton Live ready to broadcast MIDI notes 


Ableton will be the MIDI software serving the MIDI notes to other applications listening on the same network (wired or wireless). This can be light boards or lighting software, Pro-Presentor or other presentation software that "listen" on that same MIDI network we setup in Step 2 and be programmed to respond to MIDI notes for production automation. To get started, open Ableton Live and goto Live menu and then Preferences, then click the "Midi Sync" tab. On this tab, turn "On" the "Output" from Track column from the MIDI network session you created in Step 2. Basically, you are telling Ableton to output/broadcast any MIDI note you send from Ableton across this network. Secondly, you also have to set the "MIDI To" on the MIDI track to the network that you created in step 2. That's it, Ableton will now broadcast MIDI notes that are programmed in Ableton across this network.


Step 4 - Programming MIDI notes in Ableton in Session View


Ok, this is where is gets kinda complicated, especially if you are not familiar with Ableton. To get to "Session View" in Ableton press the "Tab" key. We need two tracks for this example: an audio track that will hold our loop or wav file that we are syncing to, and a MIDI track to record the MIDI notes. In the example above, I dragged a loop we used in our Christmas service into the Audio track. I can now play this track while I record MIDI notes into the MIDI track. To prepare to record the MIDI notes I do the following steps. 

1) Where arrow 1 is above, open MidiMock and set the "Destination" to "ALL". Then "Re-Open" Ableton Live, and the Preferences menu to turn on the "Track" setting to set the MidiMock as an input. 
Figure 11 - Live Preferences
2) Where arrow 2 is above, click that icon to arm the MIDI track in Session view by clicking the icon that the arrow is pointing to to turn it red. This arms the MIDI track and sets is to record all MIDI notes it detects coming in from the MidiMock application. 

3) Where arrow 3 is above, click that icon to "Record". That button will start the recording session. Ableton will start recording from the current cursor position. 

4) Where arrow 4 is above, you can set the "Output" of the MIDI track to the network we setup in "Step 2" to broadcast these recorded MIDI notes to other applications, including the "Midi Monitor" application to test that these notes are working. 

5) And where arrow 5 is above, you can "Double click" the header bar over the MIDI recording to open up the MIDI note editor at the bottom of the screen. 

Step 5 - Using these MIDI recorded notes in "Arrangement" view


We need two tracks to record in arrangement view: an audio track that will hold our loop or wav file that we are syncing to, and a MIDI track to record the MIDI notes. In the example above, I dragged a loop we used in our Christmas service into the Audio track. I can now play this track while I record MIDI notes into the MIDI track. To prepare to record the MIDI notes I do the following steps. 

1) Open MidiMock (arrow 4 above) and set the "Destination" to "ALL". Then "Re-Open" Ableton Live, and the Preferences menu to turn on the "Track" setting to set the MidiMock as an input as seen in Figure 11. 

2) Double click where arrow 1 is above to open the MIDI recording window at the bottom of the screen, then click the icon where arrow 2 is pointing to "arm" the track to be ready for recording. 

3) Finally click the icon where arrow 3 is to start recording MIDI notes. Once you click this record button, you can use the MidiMock keys to send Midi notes. 

Don't hesitate to email me with questions robertswalker@gmail.com. It took us a while to figure this out and we want to save you guys the trouble! If this helps you, drop me a line and let me know. 


Saturday, February 4, 2012

Abandoned Piano Brought Back To Life

Do you have an old piano that is locked up in a dusty old storage room at the church? If so then get it out and convert it to a very unique piece of art! In our case, our worship pastor wanted to convert this old piano into a dual keyboard stand, as well as a place to stick the laptop for loops and click.

The first step was to gut the piano and get all the HEAVY stuff out of it. We carefully removed the top and front to reuse once we installed the shelves. A huge chuck of cast iron, all the keys and hammers and all the wires had to removed. Please wear gloves and eye protection. These strings are still tight and can pop you in the face.


Demolition is complete! We left a lot of the old hardware because we thought it looked pretty cool! Also, if we tried to remove it, it might have damaged the wood. We had to bolt down the brass pedals at the bottom because they were loose and kinda flopping around. Once we finished the demolition, we put on new casters on the bottom so it would be easy to move around while we were working on it.


We put new casters on it so it would be easier to move around.


Now it is time to start building it back up! We cleaned and sanded the bottom base. Yes, it had some holes in it where the original piano hardware was, but who cares, the keyboard will cover it up. We then recycled some of the original wood of the piano to make a secondary shelf. This shelf can be used as another keyboard level, or to place music book or laptop. You can see that we put the trim pieces back on the top front edges once we put the shelf in place. 


Then we made another third shelf level just for the heck of it!


Here is a shot of the back of the piano.


We put the top back on and the rebuild is complete! We converted this old abandoned piano, gutted it and rebuilt the inside as a functioning piece of furniture. We are using it for a keyboard stand, but this could just as easily be used as a book shelf or other beautiful piece for a living room. 


It was raining the day we worked on this, so painting wasn't an option. I'll try to post a finished photo in a few weeks when we get a chance to put the finish on it. Our plan is to paint it black over the stain, and then sand off the paint to reveal some of the stain to give it a distressed look.

UPDATE: We finally got it finished and it looks fantastic! We will be loading up our keyboard into it and using it this SUNDAY!


Here it is on stage with the keyboard in place!


Sunday, January 29, 2012

Save Time Organizing Your Ministry and Volunteers

This blog could save you several hours each week! What I am going to tell you about isn't free, but it is worth every penny. It's an online tool called "Planning Center" (http://www.planningcenteronline.com) and it is an online volunteer organization tool. We first met the Planning Center team at the Arts conference at Willowcreek church several years ago. We were early adopters in their tool and we have watched it grow into a super powerful volunteer organization tool that we simply can not live without. Before planning center, scheduling volunteers was a tedious chore. Emails back and forth just to find out that our Alto has a weekend road trip planned made a friday afternoon headache a regular occurrence for our worship pastor.

Planning center allows our volunteers to "block-out" dates they aren't available, and for our worship leader to select volunteers from a list of people and the system does the emailing and scheduling conflict resolution automatically. That is just the tip of the iceberg! How do you setup your music each week so that your singers can hear the rehearsal tracks? Do you spend time burning CD's? Not with planning center. Songs that are added to the schedule are automatically added to the online media player for singers to listen to from anywhere via the web.

Listen, this blog isn't long enough to explain all the very very cool and useful features of this tool. I don't work for planning center, I was not asked to endorse their product. I am simply a user that can testify to the usefulness and value of the tool because it saves us countless hours every week and there is no way we will go back to not using this tool. Here is a video from the planning center channel off of vimeo!


Tuesday, January 24, 2012

Stage Design Idea - Crunched Screen Lighting Texture

Let me just say, this wasn't our original idea. We were searching for new stage design ideas and found this idea online where other churches were using crunched screen for a lighting surface. I just wanted to tell you this really works and it is stupid simple. And most importantly, since the point of this blog is great worship enhancements ON A BUDGET, this fits that bill perfectly as well! Go to your local Home Depot and pick up some screen cheap to get these great results. We are blessed to have great lighting, but you can use any par can with enough watts to light this to get a fresh look for your stage. In our case, the only other tools we needed to make it work was a staple gun to staple the screen to the back walls.

To get started PUT ON GLOVES! Metal screen will poke holes in your skin! Unroll the screen off the roll and just start at one end and start balling it up. Important, if the length you are trying to fill is 10 feet, then unroll 12 feet or so, because when you crumple it and stretch it back out the crumples will take up some of the length. Be safe and unroll more than you need, because you can always trim the excess. There is no precise method to the rolling, just ball it up and then stretch it back out to unfold it. The only important factor is to crumple it consistently, you want a uniform look across the stage.


The lights are installed from the bottom. This creates a great shadow effect within all the pockets where the screen in blocking the light. 


Overall effect on our youth stage. We have red lights mounted to the floor for shadows, and a blue led mounted on the ceiling shining directly on the screen. 


Back wall of our main stage. The lights are mounted above the crumpled screen. See picture below, the red wall behind the singers is crumpled screen, and we put strips of crumpled screen in-between the projector screens to fill in some dead space.


Saturday, January 21, 2012

Free Fonts

How many of you use the set of default fonts that come with the software and never change? Well why don't you try out some new fonts from a free font site called dafont.com. Once you go to the site, enter a description of the font you're going for in the search box in the upper right corner. For example, if you're looking for a "grunge" font, then put the word grunge in the search box and click the button. Once the list of candidate fonts come up, you can actually enter a sample of your text in the "custom preview" box and the dafont site will show you your custom text in the various fonts so you can see your text in context and choose the right font for your project. I have used this site for years and have greatly expanded my font library.

Here is how to install the font for a few of the main operating systems. I would make sure you close all software applications before installing new fonts so that they will be sure to show up after you install them.


Windows 7/Vista: Right-click on the font files > "Install"
Windows XP: Put the font files into C:\Windows\Fonts
Mac OS X: Double-click the font file > "Install font" button. Other OS...

What other free font sources have you guys found?

Monday, January 16, 2012

Painting Walls and Ceiling Tiles Changed Our Whole Stage

So we wanted a different look for our stage that was built about 10 years ago.  We didn't have a huge budget to make it happen, but we had plenty of help! Our dated stage had back walls that were all white and we had the white ceiling tiles like you see below. This picture shows the before and after that this blog will tell you about. The ceiling tiles on the left of the photo is the before, and the ceiling tiles on the right is after. So how did we do it?

Well, I'm not gonna lie, it was a lot of work. I said we didn't have a lot of money, but we had plenty of free labor. First we had to get the tiles down. 

STEP 1: GET THE EQUIPMENT TO TAKE DOWN THE TILES

We had scaffolding so that part was free, but if you need scaffolding you can call a local rental company and ask if you can get them to donate it for a weekend, or even better ask them for a genie lift! 

STEP 2: MARK THE TILE LOCATIONS

Now, don't just go pull the tiles down, it is very important that the tiles get marked so you will remember their location. Some of the tiles are custom cut for the square they are in, and it would be bad if you lost track of that. 

STEP 3: PAINT THE TILES AND WALLS


Let the fun begin! Carefully laying the tiles out on plastic sheeting that we picked up from the local home depot, we had rollers and gallons of flat black paint and we painted, and painted, and painted. Depending on how many tiles you have to paint, do it in shifts so you don't get burned out doing it all with the same folks. This is important because if people get bored they will get complacent and do sloppy work! 

STEP 4: REPLACE THE TILES

Now comes the payoff! Check out the photos below to see the black walls in the back of the stage, and the newly painted ceiling tiles back in place. Our plan was to also paint the tile rails and the light fixtures at some other time, but when we started putting the tiles back up, it looked so good we loved it!


Hope this helps you guys! This blog is dedicated to having an impact for Christ's kingdom and being good stewards with the funds that God gave us!